|
Instructions
Please Read
Disclaimer
The instructions below are modified from 1bad69's
Blast Shield instructions.
 |
1.
Field strip the weapon.
2. Using your favorite beverage can. Cut a rectangular strip .8” wide by 2.5” long.
3. Cut a hole the same width
as the barrel hook and slightly longer than the length
of bottom of the barrel hook on the grip frame approximately .5” from one end.
(see Fig. 1)
4. Lay the strip in the gun over the barrel hook.
5. Make an angled cut right behind the arm on the disconnector assembly that
rests on the trigger
plunger/spring
approximately .25” or so it will clear the disconnector assembly. (the
disconnector assembly is the bar running from the trigger to the sear) |
|
|
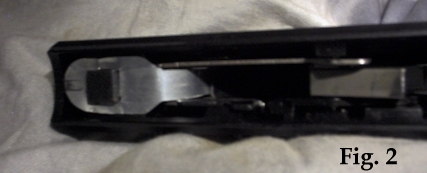
6. Make a similar cut on the other side, so it will clear the bolt
release. (should now look very similar to Fig. 2)
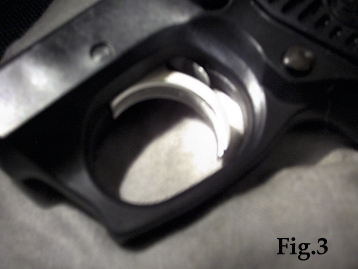
7. Place the small end in the trigger hole behind trigger.
8. Trim end behind trigger so approximately .25” is visible. (see Fig. 3)
9. Round off and sand down any sharp points or edges. |
|
|
10. Optional - if you want to paint the guard, do it only below the barrel
hook hole. Above it, the paint will make the shield too thick to
fit.
11. Insert magazine and pull trigger ensure there is no binding.
12. Test fit the barrel to the Grip, make sure there is no problem sliding
the barrel on (it will be tighter than it was), if there is, sand the
paint (label of beverage) off above the barrel hook hole.
13. Test trigger pull again with barrel
attached to ensure no binding.
14.
Assemble weapon as normal.
15. If a range is not available, load a magazine and CAREFULLY - insert
the magazine and rapidly pull back and release the bolt until all bullets
have been loaded and ejected. |
|
|
|


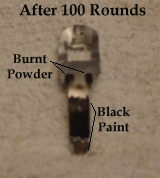 The
reason for using a Trigger Blast Shield is to keep gunpowder from getting into
the trigger. After the shield is in place some gunpowder will get into the
trigger, but most is blocked, leaving a smooth pull to the trigger even after
hundreds of rounds fired.
The
reason for using a Trigger Blast Shield is to keep gunpowder from getting into
the trigger. After the shield is in place some gunpowder will get into the
trigger, but most is blocked, leaving a smooth pull to the trigger even after
hundreds of rounds fired.
 Note: The trigger shield will make
the grip fit tighter to the barrel on reassembly. This may be a problem on
newer guns, but works great on older, looser fitting guns.
Note: The trigger shield will make
the grip fit tighter to the barrel on reassembly. This may be a problem on
newer guns, but works great on older, looser fitting guns.