Instructions
Please Read
Disclaimer
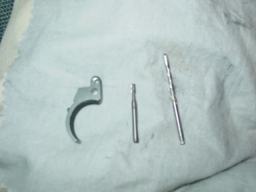
I used a dremel with 3 different bits plus some 400 grit
sand paper for this project. I know why gunsmiths charge a lot for
this stuff, it takes a bit of work to get this done. If you plan on
changing your sear I would install the new sear first, then perform the
trigger job.
1. Field strip your gun. (Instructions)
2. Disassemble the trigger assembly. (Instructions)
3. Remove the over travel screw out of the new trigger.
4. Check that the trigger pivot pin fits into the bottom
horizontal hole on the new trigger. If the pin fits, skip to step
7. If it does not you will need to widen it.
5. Using the routing bit (above picture, the bit on the
right) widen the hole. Check every 10 or so seconds to see if it is
wide enough. Be careful not to tilt the bit and wallow
out the hole but to keep it straight and widen
it.
6. You are done with this when the trigger will spin
around the center of the pin freely (gun oil will help test the fit).
7. Test that the trigger's top horizontal hole will fit
onto the end of the disconnector assembly and can pivot smoothly from full
trigger over travel (trigger hits the disconnector assembly) to about 20
degrees pre-travel. If it is smooth already go to step 9. If
it does not you will need to widen it.
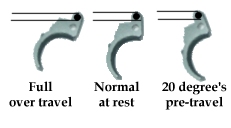
8. The hole goes from wide to narrow and it's the top wide
part that needs to be widened. Keep repeating step 7 and 8 until it
is smooth.
9. Insert trigger into grip with all parts in place except
the over travel screw.
10. To check pre-travel pull the trigger slowly. You
should see the trigger and disconnector assembly move but not move the
sear when you start to pull the trigger. You can also feel the
difference in the trigger pull, pre-travel is only the trigger spring
weight and sear movement will increase the resistance on the trigger from
the sear spring. If the sear moves no matter what and/or you don't
feel 2 different pull weights, remove the trigger from the grip.
11. Grind, file, or sand off the bottom of the trigger
where it touches the trigger guard about 1/32 inch. Reinsert trigger
into grip and repeat step 10 until you feel 2 different pull weights.
12. Once you feel the first lighter pull weight, the
pre-travel distance you have to pull is up to how much more you want to
remove from the end of the trigger. On my trigger the pre-travel
cleared at 1/32in grind but I removed another 1/16in more to keep from
having such a hair trigger.
13. Once pre-travel is adjusted, remove the trigger
and apply cold blue solution to the newly sanded/filed parts. Then insert the over travel screw and reinstall trigger and trigger shield
(if you made one).
14. To keep from dry firing my gun too many times I
roughly adjusted the over travel by pushing on the hammer and pulling the
trigger at the same time. Adjust the over travel screw to touch the
frame just after the hammer is released.
15. Assemble gun.
16. Dry fire the gun, but pull the trigger slowly to
feel the distance between the "click" and the frame.
Adjust over travel screw to personal comfort. Use Blue
Locktite to keep the screw from moving after repeated firing.


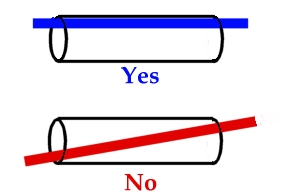
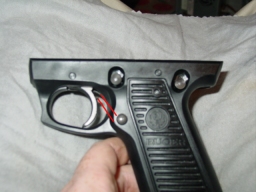 Well,
the jury is in... I love the Clark Custom Trigger. I knew before it
came in that a little work would have to be done on it to make it fit. Below
is the work that I did to make it have an 1/8 inch total travel. (the
distance between the 2 red lines in the picture)
Well,
the jury is in... I love the Clark Custom Trigger. I knew before it
came in that a little work would have to be done on it to make it fit. Below
is the work that I did to make it have an 1/8 inch total travel. (the
distance between the 2 red lines in the picture)